Tuesday, August 9, 2011

Painting Deneghra 1


Before I start this tutorial I want to mention a few things. I do not think that I am a great painter. I know for certain that there are people out there who paint minis that make me feel like crawling into the fetal position and crying. In fact, every once and in awhile when I am really proud of something I just finished painting I will throw up a picture  on "Coolminiornot.com". It is a very humbling experience. This doesn't deter me, it gives me the drive to keep getting better. Every mini I paint I try to do better than the last even if it takes me all month. Hopefully all of these great painters do the same for you. However, I find that even though I may be unhappy with the way a mini has turned out people often receive my minis warmly. I rarely feel the same way they do about my minis, but I often feel like I have achieved a standard that is higher than most mini's on the table in my local area. Like anything in life though, no matter how good you think you are, there is always someone out there who is better.

When I first started painting I didn't have a clue what was going on. I would ask friends who were into the hobby, or employees at my local GW store, but even then I was only getting the how to of 3 color basics. Thanks to the internet and Youtube, I was able to get a better understanding of what it takes to make a mini come to life. You can find thousands of resources on the internet now that were not available to hobbyists when I started tabletop. Shit when I first started playing, we were lucky to have dial up!  My goal for this blog from the start, was to compile all of the things I have learned through out my time in the hobby into one place. I am trying to provide a resource that I wish I had when I was starting out, and share all the things I have learned through trial and error so that all hobbyists, regardless of experience, can avoid or try out different things.   

So what makes me or this blog any different than a Youtube channel or any other resource out there? Well, nothing. I'm sure you can find a better explanation, or a video on Youtube somewhere in cyberspace. However, I guarantee you won't find someone who has the same style. The same goes for all of you! We can sit and watch all the Youtube videos or read all the blogs we want, but at the end of the day we will all have a different style and have things to share about what we like, don't like, or discovered while actually painting our own minis. Learning from these resources is great, but you will not be a good painter until you actually paint, and practice everyday. I should also mention that I am using a 5mp camera on a "Samsung Galaxy" smart phone, and apologize for the picture quality. Sometimes the things I am trying to demonstrate don't show up in the pictures like they do in person, but they should give you the idea of what I am talking about.

I used to paint with acrylic on canvass, and quickly learned that painting theory is the only thing that applies to mini painting. It's a whole new world of it's own, and it has required lots of practice before I have gotten my minis to turn out how I like. There is always room for improvement but I try to make them as clean and realistic as possible. Here is the step by step process I go through for every mini I paint and the techniques I use for my particular style. This is my first time painting Warmachine figures, and I must say they are very small, and presented some unique challenges. Not to mention the added stress of putting yourself out there on the internet. The figure you are painting doesn't matter, you can apply all of this to any model in any range. If you are painting huge figures you have to go about things a little differently, but we'll talk about that when I get to painting monstrous creatures.

Painting Deneghra 1:


I always start with a white undercoat. If you have access to light gray primer (Army Painter) and want to save yourself some time, use gray. As discussed earlier, some colors don't cover black undercoat very well so I use white, which will make colors too bright at times and you will have to first paint an area you want to be darker black before you can start painting your dark color. Almost all paint colors will cover gray and maintain the brightness or the deep hues of a particular color. I use white cause it's easy to purchase from GW. 


Before you start any mini you want to really study it, look for the areas you think will give you the most trouble and where your light source is coming from. Imagine you are looking at the mini standing in front of you, and determine where you want the sun to be. Where the light would fall is where you want to paint all the brightest spot. I always imagine the light source is directly above the mini's head. Look at all the different details of a mini, where each part starts and ends, what type of material would be used in real life to make each part, and how am I going to go about mounting the mini, or completing the base.

Once you have done this, you want to start from the inside out, meaning you start with the bottom layer of all the layers of detail. I usually start with the flesh and then paint all the parts in the order you would put the clothes on, if you were dressing the mini like a squire for battle. For the flesh you will need the colors shown above (I also used Devland mud on the face later on but not needed). Don't forget to dilute your paints!


Paint "Tallarn Flesh," on all the skin areas of the model. The foundation paint will give you a good base for the lighter flesh colors.

Go back over all the flesh areas with "Dwarf Flesh" and once this dries gp over all the flesh with "Gryphonne Sepia" or "Devlan Mud" wash. This Layer is to create depth and shadow.


Now go over the skin with "Elf Flesh" leaving the dwarf flesh in the areas where light doesn't reach. This will make it look like light shining on the model. A good way to go about highlighting is to place your mini under a light and just paint the lightest color in your triad on these spots.


Now move onto the clothing. I decided I was going to paint her skirt black and dark blue because this is going to be the main colors for my army. I used the colors above, use any base color from your color triad and start with these, nothing fancy yet. As a side note I want to mention that when diluting metallic paints I use pure "Liquitex Slo-Dri Fluid Retarder". If you mix water into metallic paint it will cause the metal flakes, medium and pigments that make up the paint to separate. Pure fluid retarder will eliminate this because it will hold all of the paint's properties together, and allow you to get a smooth finish when applying it. It says in the bottle to mix 25% medium to the paint. It comes out relatively slow when coming out of an eye dropper or dropper bottle so only add a tiny drop to the paint. If you are going to add a full drop of pure medium to the paint, you will have to mix 4 parts paint to 1 part fluid retarder. 


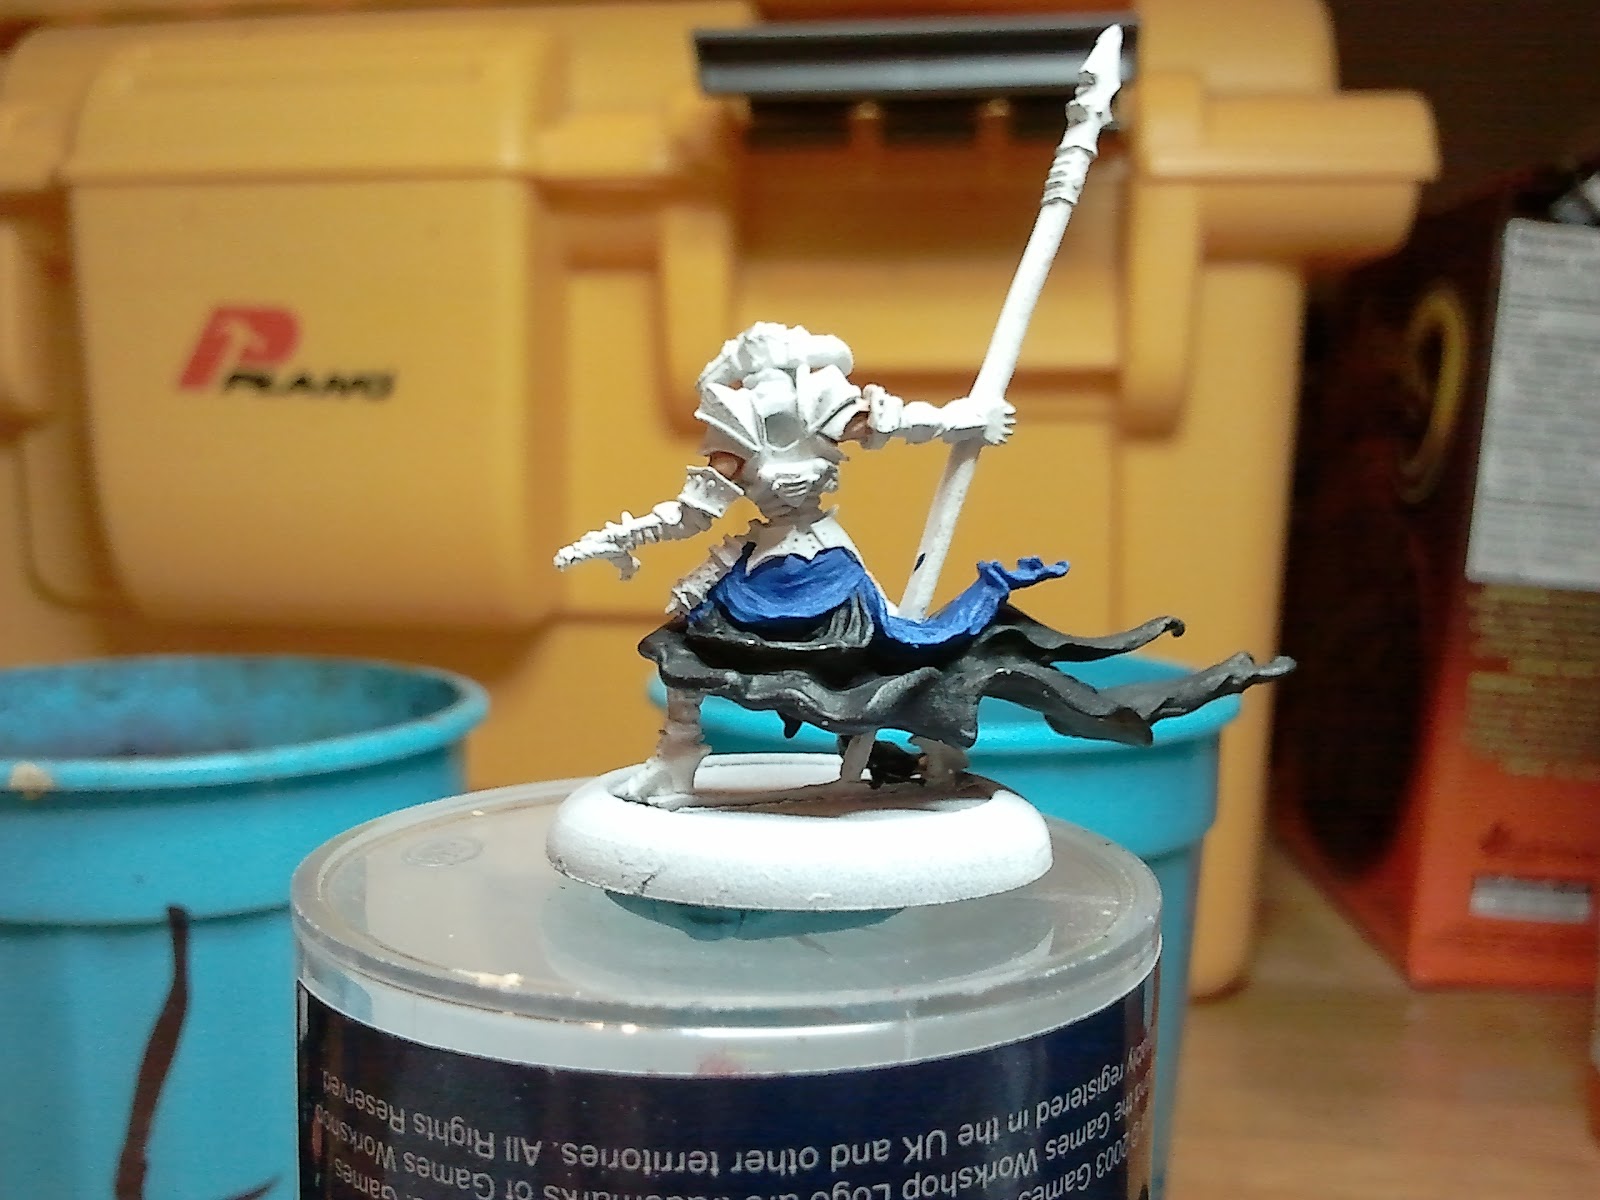
Paint the bottom of the skirt with "Chaos Black" and the top section with "Moridian Blue" foundation. I am choosing to place a color here to break up the black and to create a visual point of reference. I also want the blue to come out dark so I have painted moridian blue to tone down the white undercoat. I could have done this with black as well but I want the next color I put down to maintain it's hue.


Next paint the blue section of the skirt again with "Regal Blue" and paint all parts of the armor in "Boltgun Metal" and apply a wash off "Badab Black" to all the areas you just painted except for the flesh. This didn't come out as dark as I liked so I did a second coat of wash. Use it liberally and let it fill up the recesses. Hold the mini on it's side when applying the wash  to avoid the wash from running down or off your mini, also try to soak up with your brush any areas that wash has started to pool on the surface. This made the armor look almost black but maintained it's metal appearance and it really toned down the blue, and fit in nicely against the black.


You could just paint the shoes, back of her legs , and weapon right now an call it a day. When they say you only need three colors painted on your minis for tournaments or to play at GW stores they mean just that. Paint the skin, the clothes and the armor three separate colors and you are good to go. Some people might add a little highlighting here and there and stop, and this is perfectly fine. Painted minis are always better than unpainted mini's. But when you get your mini's you have to figure out how you wanna go about painting them. 3 color tabletop quality, or display quality for the tabletop. If You just want table top like I said you can stop here. If you want your minis to look a little more life like, then continue on with me for a little bit longer and stop when you feel you are happy with the mini. If You are wanting to push your mini further then follow me all the way to the end, It's going to be a 6-12 hour journey.

Next up Painting Deneghra 2.

Saturday, August 6, 2011

Painting Basics 2

Taking Care of Brushes:


It is best to store your brushes in some sort of protective case and to make sure they are clean before you store them. There are two ways to go about cleaning your brushes. The first, is to run them under cold water (Warm or hot water can melt the glue that holds the bristles in place causing the brush to open up of shed its hairs), gently separating the bristles with your fingers to allow water to access the center of the brush. You can then rub a little dish detergent one the brush and then rinse it off. This should clear out any wet paint. You can then rub the tips of natural hair brushes with a little bit of hand lotion to keep the bristles moist, and uniform. Never store your brushes tip down, and don't leave them sitting in your water pots. This will bend and fray the tips of your brushes and destroy them in very little time.

"Brush Restorer," is a solvent based chemical that also has a hair relaxing agent mixed into it. I use this to clean dried up acrylic paint out of paint brushes, and also allows me to keep the points for much longer durations. It can add months to the lifespan of your brush. Make sure you clean your brush well with soap and water after cleaning it with brush restorer. Any residual chemical can ruin your paint job once you get back to it.

Palettes/Water Pots:


A palette of some sort is important because diluting paint is important. Diluting paint makes it easier for you to control the paint and its thickness on the models surface. Diluting your paint will also eliminate the appearance of brush strokes, and give the model a smooth finish. You should never paint directly out of the paint pot for a number of reasons:

1) Your paint will dry up, and at $5 for 12ml of paint it can get expensive, so don't go wasting it by leaving it exposed to the air while you paint out of the lid. Transfer it to a palette and water it down.

2) The paint will come out too thick and you will make every model and every part of the model look different or unnatural. Not to mention chalky, full of brush strokes, and have an uneven finish.

3) In order to achieve certain techniques such as wet blending, glazing, blending, etc, (Discussed later) you have to dilute your paint. Even if you have used a black primer undercoat you should still dilute your paints. Because watering down paint makes the paint thinner, and requires you to paint 2 layers, you should lay down a basecoat of the color with a watered down layer of foundation paint first to ensure you aren't sitting there all day painting layers of one color.

4) When you dilute paint you can control almost every aspect of the mediums application. When you paint directly out of the pot, you have little to no control over how the paint is going to lay down every time you dip your brush. This will make you pull your hair out, or make you feel like the worst painter in the world. Maybe not though, I'm just speaking from personal experience!

All the best painters, "Golden Demon" winners, and artists who paint the amazing minis we see in the game books, and on www.coolminiornot.com dilute their paints, so if you ever wanted to have your models turn out close to this quality, I suggest you do the same. I'm not suggesting I am anywhere near as good as these painters but diluting paint has really brought my miniatures up to a higher level than when I wasn't doing it. Here is a pic of a Imperial Guard model I painted when I was first starting out, and was painting directly out of the pot onto a black undercoat, compared to a Space Marine I painted with diluted paint on a white undercoat:


You can see how thick, chalky, and brush stroked the first model is, where this is eliminated on the second with the exception of the metallic paint, which I used directly out of the pot. Of course there are certain times when you want to paint directly out of the pot to achieve different techniques like dry brushing, highlighting and dry blending (Discussed later), but for the most part I recommend getting used to diluting paint.

Also when painting it is important to clean off your brush after every couple of times you dip it in paint. This ensures that the brush doesn't get paint dried up in the center, and to stop one color from getting into another as you move from part to part on the model.  Use cold water to ensure you don't damage your brushes, and use two water pots. You want to keep your metallic and regular paint separate. When you clean off your brush with metallic paint on it, you will see that when the paint hits the water a little firework explosion takes place on the surface of the water.

After repeated rinses in the cup, you will see a scrim of metal flakes floating on top of the water. If you are using the same water pot for paint and metallic paint, you will find that when you go to paint an area that isn't metal, these little metal flakes will show up in the paint job. I have had this happen and it is annoying. I also suggest using a brush for paint and a different brush all together for metallic paints. I prefer using synthetic hair brushed for metallic paint because they are easier to clean, and they don't trap the little metal flakes inside the brush as bad as natural hair brushes.

Other tools:


I also use a light with a magnifying glass built into it, and a "Helping Hand" on occasion. The light with the magnifying glass is helpful for blowing up small details on the models so you don't have to strain your eyes for long periods of time. If I find I am getting a headache from staring at a mini for too long, I will use this set up (Picture 1) to give my eyes a break. I will also use the light to determine the light points on a model when starting the highlight phase. Make sure your bulb doesn't get hot and produce a lot of heat. I used a conventional desk lamp with a sunlight bulb inside when I started out but the bulb got so hot it would dry the paint on my brush as I was painting. This is disastrous and wasteful so use a low heat bulb. The helping hand doesn't get used very often, but if there are times I need to free my hands up, I will use it. You don't really need one though unless you are taking pictures or filming while you paint. If you have poor eyesight, arthritis, or other physical disabilities these tools will greatly help you in the  hobby.

Transferring/Diluting Paint:

Transferring paint to a palette is quite easy to do and will save you money on paint in the long run. All you have to do is grab and old paint brush and scoop some paint up with the bristle end or the other end of the brush. DO NOT transfer paint with the bristles of the brush you are painting with! You will ruin the points of your brushes and potentially get different paint colors where you don't want them. Always use an old brush.


Once you have the amount of paint you desire on the end of the brush you can get as much of it off onto the palette as you can, trying to keep it in a centralized place. Once you do this, you can add one drop of distilled water for each glob of paint you put down on the pallet. Try to keep the globs roughly the same when doing multiple globs of paint. This glob also represents "One part paint." so if you ever read "One to One mix" or "2:1," this means 1 glob of paint and 1 drop of water, etc.


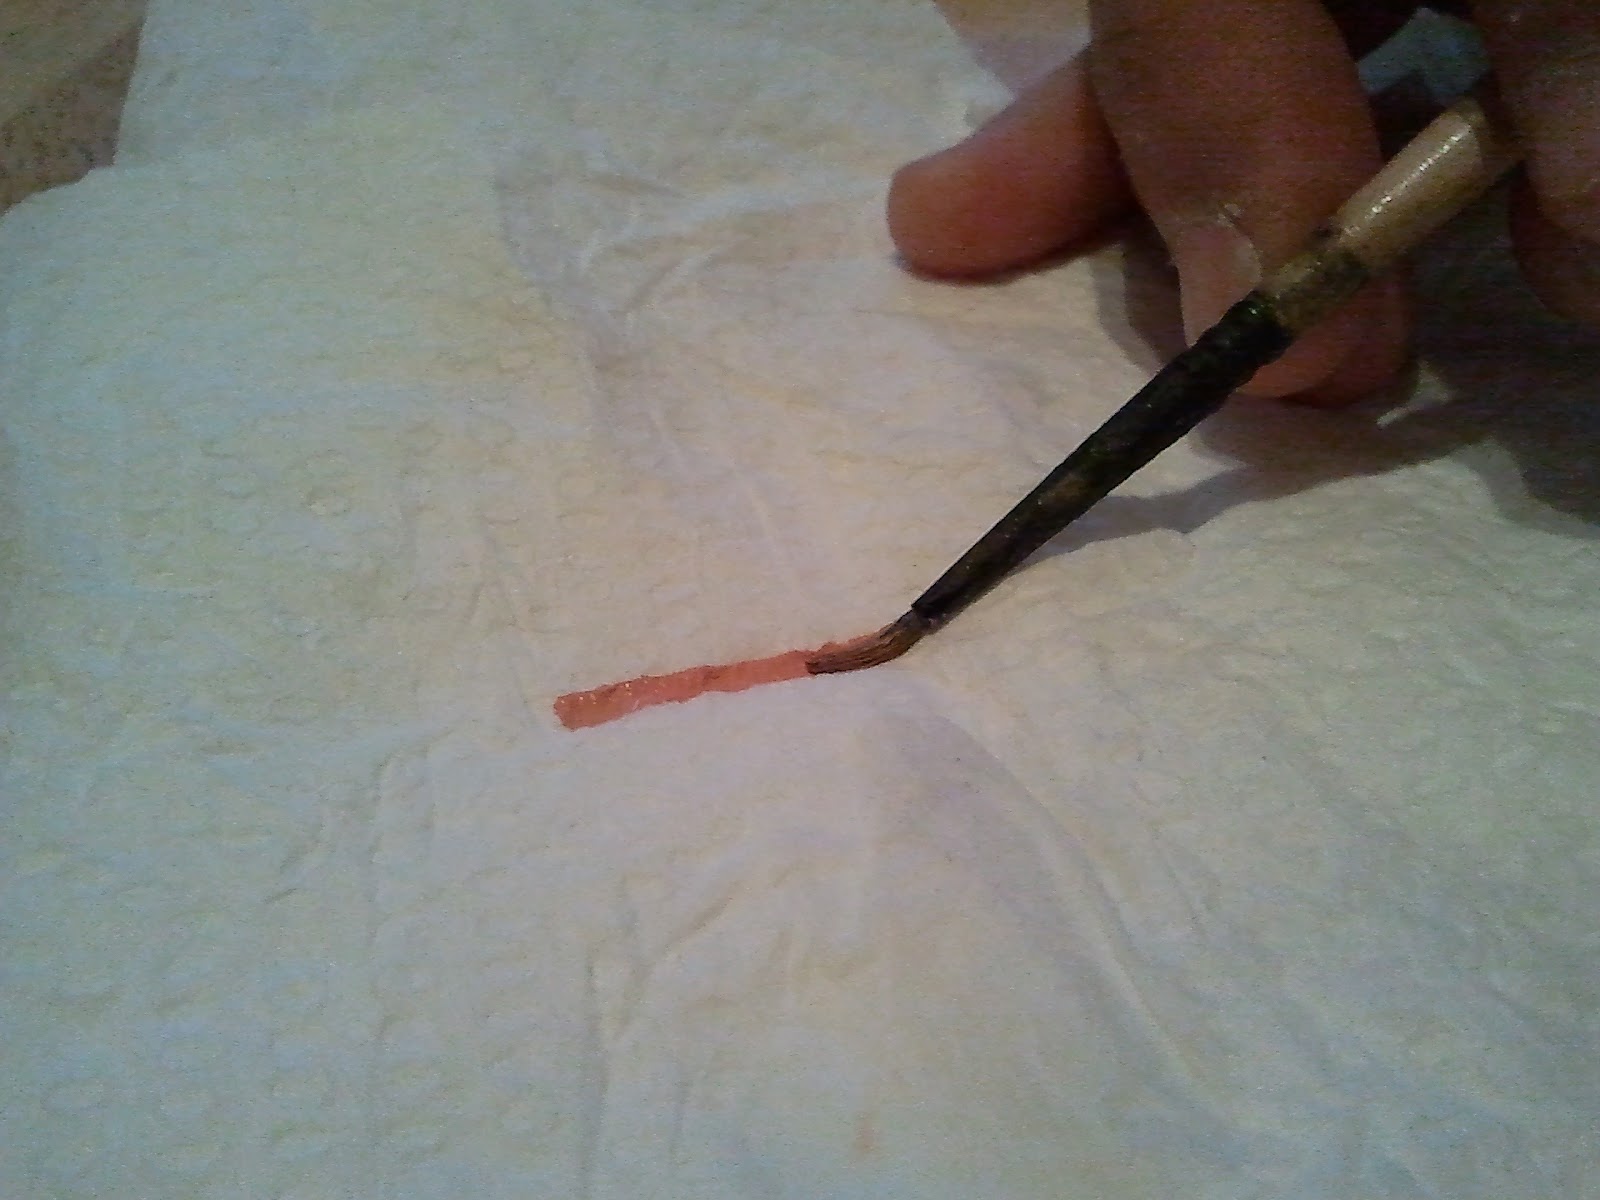
You don't want to water the paint down too much because it will run into the recesses of your model or take a lot of layers of paint to cover the area fully. I have heard some people say you want to dilute the paint to the consistency of milk, but that is hard to gauge. I use the paper towel test.


If you paint a line on a piece of paper towel, the paint should slowly ooze onto the towel, and keep a uniform line. This is how you know the paint is diluted correctly, and you can start painting.


Here is a picture of paint that is too diluted next to the original line. If the paint is too watered down it will quickly soak into the towel and create a line that spreads out . If your paint looks like the one trailing off of the brush above, you should add another dab of paint to the batch you already made. If you are using the glazing technique then this is the consistency you want it to be because you will be painting many thin layers.

Making a Wet Palette:

You can use ceramic floor tiles, disposable plastic plates, blister packages from when you buy models, and anything else that is non absorbent as a palette to dilute paint on. However, these will sometimes dry up  quickly depending on the temperature of the room you are in and humidity. So what can you do to avoid this, and give you longer work times with your paint? Maybe even store it overnight for use tomorrow. You can make a "Wet Palette." Before I start, I would like to thank "TheRealMythril" on Youtube for the tutorial.

What You Need:


Tupperware Container: One that seals air tight and locks preferably.
Sponge: Cheap thin sponge. Any sponge that will fit your container will do.
Paper Towel: To wrap the sponge in.
Scissors: To cut the sponge and wax paper.
Wax Paper: This will create the barrier between wet sponge and paint.
Water: To wet the sponge.


Place the sponge into the Tupperware container and trace around the bottom edge of the container. Make sure you do this in a direction away from your body.


Once you have the outline you can cut it out with your scissors and pull off two pieces of paper towel keeping them attached. Place the sponge inside the paper towel and fold it around the shape of your sponge and place it into the Tupperware container.


Pour a little bit of water onto the sponge and let it soak in till the whole sponge is wet. You don't have to over do it, you want the sponge moist not soaking. if water pools in the corner when you turn the container on an angle, you have too much water. Pour it out and you should be good.


Once the sponge is moist , pull off a sheet of wax paper, fold it in half and cut it to the dimensions of the container, cutting it it a way that there are too layers still attached where you folded it. Place the bottom layer of the fold on the sponge pressing down and spreading it out smooth. Once it is laying flat and starting to look a little damp you can do the same with the top layer of wax paper in the same way you did the bottom layer.


Now that both pieces of wax paper feel damp to the touch, you can start transferring paint and diluting it. Once you are finished painting, or if you have to stop mid way for some reason, and just diluted some paint, all you need to do is put the lid on it and lock it tight. The paint inside should last for 12 hours. If you need to store it longer than that you can just put it in the fridge. I mainly use this to stop my paint from drying up too quickly during hot days. When the sponge underneath starts to dry up you can remove the wax paper and add more water till it is damp again. When the wax paper get's too crowded with old paint you can just cut another piece and continue on. You should also make a new one every month or so with new materials to prevent the container from getting moldy.

Next up: Painting Deneghra 1, and a quick discussion on techniques. Happy Painting!